Clone / Resize / Move of Windows partitions
In case you’re running out of Disk Space, or you need to resize different partitions, this tutorial is for you.
Furthermore, it will allow you to transfer your Windows Environnement from an IDE Disk to an S-ATA Disk (or vice versa)
What you’ll need :
- a bigger Hard disk then you’re already using.
- CloneZilla Live CD (or USB-Stick)
- Gparted Live CD (or USB-Stick)
- Time
- Preparation of the Windows System
Optional : Clean Temporary Files
(I recommend using ccleaner : www.ccleaner.com)
Recommended : Defrag Hard Drive / Partition
- Cloning the Hard Drive
With the second hard Drive plugged in, boot your Computer with CloneZilla (CD or USB), then follow On screen Directions to clone your Hard Drive (Device to Device)
- Resize of existing Partitions
Unplug your original Hard Drive, then boot your Computer with Gparted Live (CD or USB)
Once GParted Live hast started (you may have to answer some questions during startup),the Partition Editor wil start.
Normally your Hard Drive is already selected, but be sure that it’s the right one in case you have more than 1 Hard Drive.
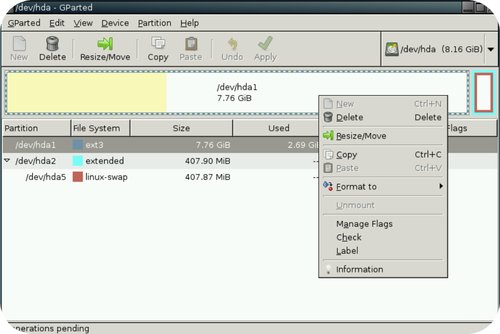
Here, you can right-click the partitions and select several options. You’ll want to choose “Resize / move”
Following this, you can slide the little slider tool to adjust / move / resize partitions. After your choice has been made, don’t forget to hit “Apply Changes”.
Cross your fingers, and go have a coffee, as some operations might take a long time, depending of the size of the Hard Drive you have.
When finished, simply reboot your Computer into Windows. Everything should be there as before, with the difference that your partition(s) are bigger.








Rezent Kommentare